 To you and yours – a peaceful one.
Category: craft

Pins
 Small pieces of stitching are usually enough to satisfy creative urges without becoming overwhelming projects that slip into the ‘will finish some day’ box.
Heart pins fit the bill. Creativity is assuaged in the selection of fabric and thread colour, and size ensures the piece makes it to completion. Pinning one onto a denim jacket or a canvas satchel, is quite gratifying – you have endorsed your look with your own logo.
Make yours by:
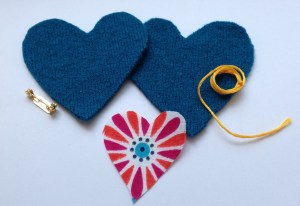
- Cutting two large heart shapes from felt (I used old felted jumpers) and one small heart from a scrap of coordinating cotton fabric. These templates are perfect.
- Using a contrasting thread (stranded cotton is available in a myriad of colours) blanket stitch your cotton heart onto the front of one of the felt hearts.
- Sew a brooch pin (or safety-pin) to the back of the second felt heart.
- Place both felt hearts (blank sides together) and using a second contrasting thread, blanket stitch your way around the edges, so both are attached.
- If your heart is to be gifted, cut some coloured card into squares, pin on your heart and slip into a plastic bag.

Postscript: See if you can stop at one.
Share this:

Share this:
Wrap

Anticipation claims a good fifty percent of the enjoyment of receiving a gift. Peeling away a colourful sheath to reveal hidden treasure will capture even the most seasoned adult’s attention. Watch children at Christmastime tear open long-awaited santa deliveries, immersed in the thrill of expectation.
Despite the profusion of sophisticated giftwrap and the related trimmings available, I find brown paper parcels particularly appealing. Maybe this links back to a time before postpacks, when parcels were sent in the mail securely wrapped for the journey in their crisp brown coatings and neutral twine lacing. Ours usually arrived addressed in the unmistakable curled handwriting of my grandmother, and I knew to expect some new ‘woollens’, a newsy letter and a lovely soft toy upon opening.
Moving into 2012, plain paper and string strikes a sustainability chord. No inks or bleach and fresh flowers that will eventually be returned to the earth, sits well with me.
If you arm yourself with a few rolls brown paper and a large ball of twine, this will serve as your gift wrapping kit, to cover all ages, occasions and gender. Look to your garden for the finishing touches – herbs, flowers, autumn leaves and pods – to personalise your package that will be eagerly anticipated.
Postscript: if you ‘garnish’ your gifts in other ways – do tell!
Share this:

Share this:
Crane

A work colleague of ours is dealing with a difficult illness and in response, her family and friends have decided to fold 1000 paper cranes to peacefully assist her.
If you are not aware of the story behind the origami cranes, it originates from a Japanese legend. In Japan, the crane is a considered a sacred bird and the belief is that if 1000 paper cranes are folded the recipient will be granted a wish or eternal good luck by a crane.
Keen to support this, a large group of us set about folding cranes for our colleague. Whilst we didn’t quite reach 1000 in the time we spent, there are now a large bundle of cranes that will join many others folded by a network of people who care.
What I saw, were many pairs of hands employed by compassionate hearts.

Folding an origami crane for someone special, is a simple yet powerful gesture to make.
Postscript: To brighten someone’s day, you can find the crane folding directions here. If you need greater visual guidance, YouTube offers many clear demonstrations.
Share this:

Share this:
Sachet

When lavender is blooming, all is well with the world.
Bees waste no time bustling around, seeking out the makings of their honey, while the purple heads nod in the light spring breeze.
After you (and the bees) have enjoyed the best of the blooming time, you can harvest your lavender for sachet making. Cut a nice bunch and lie it flat for about a week or so to dry. When the flowers feel ‘crispy’, shed the heads into a jar. You can even collect the tiny seeds for new plantings while you’re about it.

To make the sachets, cut two 4 inch squares of fabric, place them together and sew around three of the sides (about 1/2 inch in from the edges). Fill the bag through the opening you created, with your fresh harvest. Sew up the last side. Use pinking shears to trim the four sides. Tuck your sachet away, and enjoy the fragrance whenever you visit!

These sachets are quick to make, so rustle them up in batches and dot them around your home. Mine live between towels and sheets, with the socks and undies and if I remember, under my pillow.

